Visual Studio Online – Stakeholder license

A great new feature of Visual Studio Online (TFS in the cloud) has seen the light of day: The stakeholder license.

You can now add stakeholders to your project free of cost. They can perform most work related tasks, like writing and editing backlog items (user stories). They can’t commit code obviously, for that you need to buy at least a Basic license.

So invite your business owner, the testers, the sales reps etc to review user stories, write accept criterias etc. That is how I prefer to work, and it is awsome that Microsoft is adding this feature to Visual Studio Online!

The full list of features available to the stakeholder includes.

  • View, add, and modify items on the backlog
     View team home pages and portfolio backlogs
     View, create, and modify work items such as stories, features, and bugs
     View, create, and save queries
     Sign up and receive alerts when changes are made to work items.

See more at http://www.visualstudio.com/get-started/work-as-a-stakeholder-vs

Making CRM record IDs searchable

Sorry. It’s not possible.

To display the record ID of an entity on a form, in a view or in advanced find, we need to copy the value to a text attribute.

Simple enough: create a new attribute (named new_recordid or whatever you prefer) and register a plugin on the create message of your relevant entity that copies the ID. Make sure you register it post create, or your record wont have an ID yet.

Here is the plugin code. I use CRM developer toolkit so the plugin is in that style.


using System;
using Microsoft.Xrm.Sdk;

namespace Plugins
{
    public class CopyRecordId: Plugin
    {
        public CopyRecordId()
            : base(typeof(CopyRecordId))
        {
            RegisteredEvents.Add(new Tuple<int, string, string, Action<LocalPluginContext>>(40, "Create", "account", ExecuteCopyRecordId));
        }

        protected void ExecuteCopyRecordId(LocalPluginContext localContext)
        {
            if (localContext.PluginExecutionContext.Depth > 1)
                return;

            Entity entity = new Entity(localContext.PluginExecutionContext.PrimaryEntityName);
            entity.Id = localContext.PluginExecutionContext.PrimaryEntityId;
            entity.Attributes.Add("new_recordid", localContext.PluginExecutionContext.PrimaryEntityId.ToString().Trim('{', '}'));

            localContext.OrganizationService.Update(entity);

        }
    }
}

Creating deployment packages for CRM 2013

The spring 14 update of the CRM 2013 SDK (Leo) comes with a number of new tools, including a new deployment framework. The short version is that it allows you to build a deployment package in Visual Studio (with customizations, data and custom code steps) and deploy the package to CRM with a visual tool or even better: With PowerShell.

This post is about creating the deployment packages with Visual Studio. I will write a post on how to deploy the package later on.

What can it do?

With the new Visual Studio template, you can create packages that will let you:

  • Deploy CRM Solutions
  • Deploy data packages created with Configuration Manager
  • Deploy data in CSV or XML file formats with CRM Map files
  • Execute custom code (.net) during deployment process
  • Display information to the user before and after the deployment process in HTML format

Getting started

Before you start building your deployment package, you need to install a new Visual Studio template.

Download the SDK and run \SDK\Templates\CRMSDKTemplates.vsix

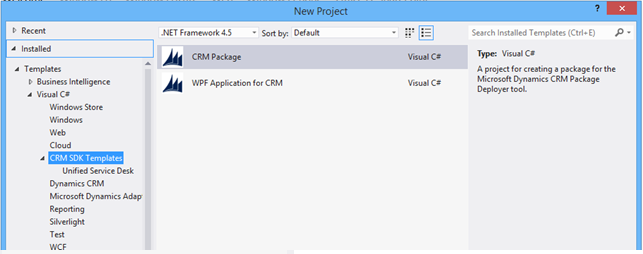
Now you are ready to start Visual Studio. Do so and create a new project of type CRM SDK Templates\CRM Package.

4

The project structure

The project tree includes a number of interesting elements that we need to know how to use. I have “highlighted” the most interesting below:

2

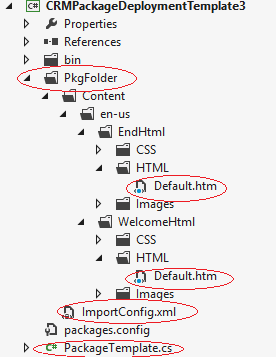
The PkgFolder is where you place you content: CRM solution files, Configuration Manager zip files and xml/csv files.

The two default.htm files are where you can edit the message shown to the user before and after deployment.

ImportConfig.xml is where you configure what should happen during deployment (what solutions to import, what data files etc)

The PackageTemplate.cs is where you can hook up you own custom code.

PkgFolder

When you want to add content to this folder you should copy you files to its root. Not to the Content folder, but directly in the PkgFolder. After adding files (say a CRM solution file) you need to right click it, choose Properties and then set Copy to Output Directory to Copy Always.

3

The files you add to you PkgFolder also need to be added to the ImportConfig.xml file (see below). Be aware that while you can add as many Configuration Manager zip files to the folder as you wish, you can only configure one for import in the ImportConfig.xml file.

Default.htm

These files can be edited with whatever information you like to you user. If you import you package with PowerShell it looks like they are ignored all together.

ImportConfig.xml

Edit this file to specify the steps of the deployment procedure. Fresh from start the file looks like this:

<?xmlversion="1.0"encoding="utf-16"?>

<configdatastoragexmlns:xsi="http://www.w3.org/2001/XMLSchema-instance"xmlns:xsd="http://www.w3.org/2001/XMLSchema"

installsampledata="false"

waitforsampledatatoinstall="true"

agentdesktopzipfile=""

agentdesktopexename=""

crmmigdataimportfile="">

<solutions>

<configsolutionfilesolutionpackagefilename="solutionFile.zip" />

</solutions>

<filestoimport>

<configimportfilefilename="File.csv"filetype="CSV"associatedmap=""importtoentity="FileEntity"datadelimiter=""fielddelimiter="comma"enableduplicatedetection="true"isfirstrowheader="true"isrecordownerateam="false"owneruser=""waitforimporttocomplete="true"/>

<configimportfilefilename="File.zip"filetype="ZIP"associatedmap="ZipFileMap"importtoentity="FileEntity"datadelimiter=""fielddelimiter="comma"enableduplicatedetection="true"isfirstrowheader="true"isrecordownerateam="false"owneruser=""waitforimporttocomplete="true"/>

<zipimportdetails>

<zipimportdetailfilename="subfile1.csv"filetype="csv"importtoentity="account" />

<zipimportdetailfilename="subfile2.txt"filetype="csv"importtoentity="contact" />

</zipimportdetails>

</filestoimport>

<filesmapstoimport>

<configimportmapfilefilename="FileMap.xml" />

<configimportmapfilefilename="ZipFileMap.xml" />

</filesmapstoimport>

</configdatastorage>

But after I edited it to fit my simple needs (a CRM solution, some data from Config manager and a little custom code) it looked remarkably simpler:

<?xmlversion="1.0"encoding="utf-16"?>

<configdatastoragexmlns:xsi="http://www.w3.org/2001/XMLSchema-instance"xmlns:xsd="http://www.w3.org/2001/XMLSchema"

installsampledata="false"

waitforsampledatatoinstall="true"

agentdesktopzipfile=""

agentdesktopexename=""

crmmigdataimportfile="data.zip">

<solutions>

<configsolutionfilesolutionpackagefilename="MyFavoriteSolution_1_0_0_0.zip" />

</solutions>

</configdatastorage>

The key elements are crmmigdataimportfile attribute where you specify the Configuration Manager zip file (data) to import and the <solutions> element where you specify the CRM solution files to import.

All the FilesToImport stuff is related to importing csv or xml files during import. I haven’t really tried yet, but I might post an update about that once.

PackageTemplate.cs

This is where you can write you own cod that gets executed during the deployment process at various stages.

As far as I can tell you have three hooks:

  • BeforeImportStage
  • RunSolutionUpgradeMigrationStep
  • AfterPrimaryImport

So you can execute code before it all begins, when a solution is upgrated or after the import of solutions (and data? I’m not sure yet) is completed.

An example:

public override bool BeforeImportStage()
{
   CrmSvc.OrganizationServiceProxy.Create(newEntity("lead"));
   return true;
}

It might not be very useful, but the code will create an empty lead before importing solutions and data. The point is that you have a hook to the CRM OrganizationService, so you can do all you CRM manipulations. Remove a field that is no longer used for example.

Deploying the package

Once you have built you package you can deploy it to you CRM system. There are two options: A windows client or PowerShell.

My next blog post will be about deploying CRM Deployment Packages with PowerShell.

Conclusion

This looks promising. Obviously, we haven’t used this on real projects (the tools are less than a week old) but as far as I can tell this will be the default choice for deploying CRM solutions in the future. The ability to bundle together customizations and data, and to manipulate the system with code is awesome. +1 for the CRM SDK team at Microsoft :)


CRM Configuration Manager

The SDK for the Spring 14 release (Leo) of CRM 2013 comes with a few new tools. One of them is called the Configuration Manager. The executable file is called DataMigrationUtility.exe and that name nails it. It’s a tool for moving data from one CRM system to another.

So far, I am impressed, the tool works great and from my point of view, it will become an essential part of many of our projects. Not so much for migrating data from one production system to another, but more for deploying base data (zip codes, countries, etc…) to production and test systems, and test data to test systems. It’s a great tool for building a set of data packages with a shared set of test data (placed in source control of course) that can easily be deployed to new instances of test systems, or used to “reset” your test environments.

The tool integrates very well with the new CRM Package Deployer and the new Visual Studio template for building deployment packages for CRM.

Great work Microsoft!

Getting started

To start the program run \SDK\Tools\ConfigurationMigration\DataMigrationUtility.exe

1

You now have three options: Create schema, Export data or import data. Basically a schema is a definition of what data to export and how to import it.

To get started chose to create a new schema and click Continue. Next window is the new common login window that the SDK team is applying to all its tools. We used to have a different flavour for each tool, now there is one. And it is easy to use!

2


Enter your credentials for you CRM 2013 server and click login.

Now you are ready to design you Schema, by defining what files from what entities should be exported/imported. Don’t click “Add all” on your default solution – that literally means exporting your entire CRM system. Choose the entities you want to add and click add entity.

3

Notice how it includes relationships. The tool maintains relationships across systems for you, and you don’t even have to configure it.

There are a few options for the import process that can be defined in the schema. If you click Tools – > Configure import settings you can, among other things, disable plugins during import for single entities or the entire system. Useful in some cases.

Once you are done you can save your schema from the File menu or you can click Save and Export. The later will both save the schema and export the data as configured.

4

Import

This is really simple: Click import (from the start screen of the application), choose a zip file to import (notice how the schema is saved in the zip file along with the data) and click Import data.

5

Export (in case you have your schma defined up front)

Click Export Data from the start screen. Choose a schema file (the one you defined with the schema designer) and a zip file that you want to export your data to. Click Export data and wait for the process to complete.

6


There is much testing to be done before I can give my final review of the program. Does it handle statecodes, closed activities, owners, business units etc.? I don’t really know yet. But from what I have seen so far, the tool is great and the fact that the output (zip files with schema and data) can be used as part of the deployment process with the new CRM Package Deployer is a killer feature.

Create a bunch of CRM fields with code

Today I encountered the task I hate the most: brainless repetitive tasks in the CRM UI. I had to create 18 fields with the same names on 6 entities. It sounds like I screwed up in database normalization, but it actually makes perfectly good sense – the values of the fields are different on the various entities.

Anyway, I was left with two choices – create the 108 fields in the CRM UI (and suffer mouse injury to my right arm) or do it with code. It’s probably easy to guess what the nerd chose.

First I compiled the list of the 18 fields to be created. They are all of the same type so that makes it easy:

List<KeyValuePair<string, string>> liste = new List<KeyValuePair<string, string>>(); 

liste.Add(new KeyValuePair<string, string>("pa_fee1", "Fee 1")); 
liste.Add(new KeyValuePair<string, string>("pa_fee2", "Fee 2")); 
liste.Add(new KeyValuePair<string, string>("pa_feetotal", "Fee Total")); 

(…) 

That’s nice and easy. Now all I had to do was to loop the list and create the fields:

   foreach (var keyValuePair in liste) 
   { 
      var attrib = new DecimalAttributeMetadata 
      { 
         SchemaName = keyValuePair.Key, 
         LogicalName = keyValuePair.Key, 
         DisplayName = new Label(keyValuePair.Value, 1033), 
         RequiredLevel = new AttributeRequiredLevelManagedProperty(AttributeRequiredLevel.None), 
         IsAuditEnabled = new BooleanManagedProperty(true), 
         MaxValue = 1000000000, 
         MinValue = -1000000000, 
         Precision = 2, 
      }; 

      CreateAttributeRequest createAttributeRequest = new CreateAttributeRequest 
      { 
         EntityName = pa_quoteobject.EntityLogicalName, 
         Attribute = attrib 
      }; 
      IOrganizationService service = GetOrgService(); // use a simplified connection (CrmConnection) or something to create an IOrganizationService
      service.Execute(createAttributeRequest); 
   } 

Hit F5 – go get a cup of hot chocolate – and my fields are all there. Now I just had to replace the entity name 5 times and drink another 5 cups of hot chocolate and I was done.

Summary
In this post I have shown how to create fields in a simple manner. They are all of the same type, and have the same properties (precision, min value, max value etc) but the code can be extended to suit your needs.

xRM Test Framework for Dynamics CRM 2013 is now available

Wael Hamze has created a cool xRM Test Framework that has really caught my attention. It looks awesome! Especially the use of Microsoft Fakes to test plugins looks promising.

Wael Hamze

The xRM Test Framework  is a set of tools that allows you easily and quickly create automated units and integration tests for your Dynamics CRM extensions.

Testing plug-ins and custom workflow activities can be quite challenging and time consuming using standard approaches. This sometimes discourages developers from writing automated tests for Dynamics CRM extensions. This can lead to quality issues and wasted effort and time down the line. The framework attempts to encourage the adoption of testing best practices in Dynamics CRM projects.

Below is what the framework provides.

Base Test Library

  • Bases classes for testing Plug-ins and Custom Workflow Activities. All tests extend from these classes.
  • These cover your Unit & Integration Tests
  • These do most of the ground work and allow you to focus on writing your test scenarios in your tests.
  • Available via NuGet
  • Support for Microsoft Fakes & Moq

Below is a high level diagram for the…

View original post 288 more words

Registering CRM plugin steps programmatically

Yesterday I was faced with the challenge of having to register plugin steps with code. I know it’s not a very common task but it happens. I guess the most common case is to have some reusable solution that includes plugins that can run on arbitrary entities that are unknown when building the solution.

Say for example a sequence number solution. You build some generic plugin that can get a sequence number from somewhere and set a property of an entity with the sequence number. You build some clever configuration system so the plugin doesn’t have to be hard coded to specific entities/fields. You can deploy your solution, but you still have to manually create the steps for the plugins so it runs when the correct messages are executed on the correct entities. Say on create of an account.

In the example above it would be nice to be able to add the plugin steps without the use of the plugin registration tool. A configuration page in Silverlight or html5 maybe? Or a small console application or PowerShell CmdLet? Whatever suits you – I personally prefer PowerShell.

Anyway, the web is not exactly full of examples, and certainly not for the 2011/2013 SDK. In this regard (and many others) the 2011 and 1013 sdk are identical. Pre 2011 you had special SDK messages, but now plugin steps act like entities. All you have to do is to insert the correct data in the SdkMessageProcessingStep entity.

First you get a few enumerators to help us out:


enum CrmPluginStepDeployment
{
   ServerOnly = 0,
   OfflineOnly = 1,
   Both = 2
}

enum CrmPluginStepMode
{
   Asynchronous = 1,
   Synchronous = 0
}

enum CrmPluginStepStage
{
   PreValidation = 10,
   PreOperation = 20,
   PostOperation = 40,
}

enum SdkMessageName
{
   Create,
   Update,
   Delete,
   Retrieve,
   Assign,
   GrantAccess,
   ModifyAccess,
   RetrieveMultiple,
   RetrievePrincipalAccess,
   RetrieveSharedPrincipalsAndAccess,
   RevokeAccess,
   SetState,
   SetStateDynamicEntity,
}

I guess the enums are pretty much self-explanatory.

Next we need to define some variables. How you set them depends on your choice of technology; text fields on a web page, args to a console app, parameters of a PowerShell CmdLet etc.

var AssemblyName = "MyCompany.MyProject.Plugins";
var PluginTypeName = "MyCompany.MyProject.Plugins.AssignSequenceNumber";
var CrmPluginStepStage = CrmPluginStepStage.PreOperation;
var EntityName = "account";
var StepName = "Assign sequence number to newly create accounts";
var Rank = 1;
var SdkMessageName = SdkMessageName.Create;

You need to have a plugin assembly registered that matches the namespace above, and you need to initiate the service object with an IOrganizationService. Use a Simplified Connection for that.

Now you can create the SdkMessageProcessingStep with the following snippet.

SdkMessageProcessingStep step = newSdkMessageProcessingStep
{
   AsyncAutoDelete = false,
   Mode = newOptionSetValue((int)CrmPluginStepMode.Synchronous),
   Name = StepName,
   EventHandler = newEntityReference("plugintype", GetPluginTypeId()),
   Rank = Rank,
   SdkMessageId = newEntityReference("sdkmessage", GetMessageId()),
   Stage = newOptionSetValue((int)CrmPluginStepStage),
   SupportedDeployment = newOptionSetValue((int)CrmPluginStepDeployment.ServerOnly),
   SdkMessageFilterId = newEntityReference("sdkmessagefilter", GetSdkMessageFilterId())
};
OrganizationService.Create(step);

As you can tell, you need to look up a few values in CRM for the code above to work. Here are the helper methods you need.

private Guid GetSdkMessageFilterId()
{
   using (CrmServiceContext context = newCrmServiceContext(OrganizationService))
   {
      var sdkMessageFilters = from s in context.SdkMessageFilterSet
      where s.PrimaryObjectTypeCode == EntityName
      where s.SdkMessageId.Id == GetMessageId()
      select s;
      return sdkMessageFilters.First().Id;
   }
}

private Guid GetMessageId()
{
   using (CrmServiceContext context = newCrmServiceContext(OrganizationService))
   {
      var sdkMessages = from s in context.SdkMessageSet
      where s.Name == SdkMessageName.ToString()
      select s;
      return sdkMessages.First().Id;
   }
}

private Guid GetPluginTypeId()
{
   using (CrmServiceContext context = newCrmServiceContext(OrganizationService))
   {
      var pluginAssemblies = from p in context.PluginAssemblySet
      where p.Name == AssemblyName
      select p;
      Guid assemblyId = pluginAssemblies.First().Id;
      var pluginTypes = from p in context.PluginTypeSet
      where p.PluginAssemblyId.Id == assemblyId
      where p.TypeName == PluginTypeName
      select p;
      return pluginTypes.First().Id;
   }
}

The code a little simple – it doesn’t support registration of images for example. But it works and will get you started. I hope it helps, figuring this out took me a while. I hope that my examples make it a little easier.

Getting started with Application Lifecycle Management (ALM) in CRM – Part III

Part I and II of this blog series have focused on getting code in TFS. This post is about data.

CRM Data in TFS

There is one central dogma in my view of ALM: Everything goes into source control.

Data is part of “everything” so it goes in to source control.

CRM data is stored well in the SQL database so why would you put it in TFS? Well there are many types of data, and for many purposes, we need to be able to deploy data to a CRM system. Below are a few examples.

Test data to test CRM system

When we set up a new test system, we can easily import solutions that customizes CRM from vanilla to fit our needs. But the system will be clean when it comes to data. Testing often relies heavily on data to match test cases, and it might not be easy to set up those cases manually. At best it can be tiresome manual labour, at worst it can be impossible. Fields might be read-only for data from other systems; closed activities in the past are hard to create and so forth. Moreover, people make mistakes; a test might fail just because the tester entered the incorrect data.

A common set of test data in TFS can help us here.

Lookup data

List of countries, cities, product types etc. Most CRM project have those entities. This is data that has to be deployed to all environments; test, prod, pre-prod and what have we.

How to do it?

To some extend we could use the standard export and import features of CRM (relations is a problem) or we could use some data broker tool (Scribe, BizTalk…) but for many reasons we need something slightly different for this task.

Requirements:

– Export (serialize) whole or part of CRM

– Keep relation integrity

– Keep ID’s of records

– Simple to use

– No manual mapping

– Save data in files in humanly readable format

– Possibility to hand edit data files

– Support for CRM special fields (status, owner, created/modified on etc)

There aren’t many tools out there that will help you, actually I know of only one: ALM Toolkit from AdxStudio – a commercial product works great and will live up to the requirements above and more.

The alternative is to start up visual studio and write one yourself. I did (a huge task) but it’s not even half done.

Getting started with Application Lifecycle Management (ALM) in CRM – Part II

In my previous blog post, I wrote about the importance of placing every bit of your CRM project under source control, and how we can do that with web resources. In this post we will work with solutions.

Solutions

Why put solutions in souce control? It’s not like the build server is going to build the solution before applying it to a CRM system. Well the answer is twofold:

  1. If your dev servers were to disappear in a puff of smoke – what would happen? In a well-governed CRM project the only setback would be the time it would take you to buy new servers and restore them from TFS. Servers don’t disappear, but they do break down. Version control helps us ensure that we can recover from a disaster without losing completed work.
  2. Keep track of changes and add the ability to rollback those changes. If we have everything in TFS, we can get yesterday’s check-in and undo today’s errors. Or we can experiment with some radical change in our data model and discard it if it turns out bad, etc.

Your solutions is the source code of your project, and as such, you should place unmanaged solutions in TFS. How you ship them is a different discussion for a different time.

So how do we put solutions in TFS? The easiest answer is to manually export them and check them into TFS. That is NOT how you want to do it in a real world scenario, but for now, we go through the process for educational reasons. Once we have seen the process, I will provide a scripted solution.

When reading the following you will be thinking that it wont last a week until someone gets tired of manual processes and stops doing it. Therefore, below the manual process there is an example of how to automate it.

Use Solution Packager to track the changes in your solutions

Having a “backup” version of your solutions in TFS is nice, but sometimes you need to keep track of what was actually changed. You add new fields, remove others, create entities and so forth. Version control of those changes can easily be achieved by exporting your solutions and checking them into TFS.

But if you want to compare version to version you need a little more tooling. The SDK comes with a great tool called the SolutionPackager (SDK\bin\solutionpackager.exe). This tool allows you to extract a solution file to a folder structure and pack it all up again. In our case we will extract a solution to a folder and check the entire folder into TFS. Next time we change something in the solution we will repeat the process and watch how Visual Studio will show the diff in an easily understandable manner.

Here are the steps:

  1. Export your solution (manually) and save it in a folder under source control.
  2. Use solutionpackager.exe to extract the file:
    solutionpackager.exe /zipfile:MyFavoriteSolution_1_0_0_0.zip /action:Extract /folder:MyFavoriteSolution
  3. Use Team Explorer in Visual Studio to add and check the folder and solution file into TFS.
  4. Make your change in CRM. Say change the name of an entity, alter a form, add a field or whatever.
  5. Check the solution and the new folder out for edit with Visual Studio and replace the solution file with a newly exported from CRM.
  6. Repeat the Solutionpackager extract procedure
  7. Check everything into TFS.

solutionpackager
Observe how the solution is extracted into a folder structure and how each xml file (views, entities etc.) is small and understandable.

Now use the history functionality in Visual Studio to identify the changes and observe how TFS filtered out the unchanged files and kept only the ones that had actual change in them. You can double click one of the files and get a diff of the changes.

CompareWithVisualStudio
Observe how the change in the Entity.xml file is highlighted and easily readable

Could we automate it?

The manual procedure not what you want to go with in a real-world scenario. It takes time and soon everyone will stop doing it because they grow tired of tedious manual processes.

Writing a script that automates the procedure is simple. I would recommend using PowerShell for this, and at ProActive where I work we have written a lot of PowerShell CmdLets for doing ALM in CRM. But for now I will keep things really simple, and just do it with a bat file.

Bat file

"C:\Program Files (x86)\Microsoft Visual Studio 11.0\Common7\IDE\tf.exe" checkout MyFavoriteSolution_1_0_0_0.zip
"C:\Program Files (x86)\Microsoft Visual Studio 11.0\Common7\IDE\tf.exe" checkout MyFavoriteSolution /recursive
export.exe "MyFavoriteSolution"
solutionpackager.exe /action:Extract /zipfile:MyFavoriteSolution_1_0_0_0.zip /folder:MyFavoriteSolution
"C:\Program Files (x86)\Microsoft Visual Studio 11.0\Common7\IDE\tf.exe" add MyFavoriteSolution /recursive
"C:\Program Files (x86)\Microsoft Visual Studio 11.0\Common7\IDE\tf.exe" add MyFavoriteSolution_1_0_0_0.zip /recursive
"C:\Program Files (x86)\Microsoft Visual Studio 11.0\Common7\IDE\tf.exe" checkin /recursive /comment:"Auto check in of solution" /noprompt

As you can tell from the bat file there is a piece missing: export.exe. The rest is just Visual Studio and CRM SDK stuff. However, we need to be able to automatically export solutions from CRM. In our projects, we use a set of PowerShell CmdLets that we wrote for the purpose. To keep things simple for anyone who don’t know PowerShell I wrote the export.exe program in plain C#.

class Program
    {
        static void Main(string[] args)
        {
            CrmConnection con = new CrmConnection("crm");
            IOrganizationService service = new OrganizationService(con);


            ExportSolutionRequest request = new ExportSolutionRequest
            {
                SolutionName = args[0],
                Managed = false,
                ExportAutoNumberingSettings = false,
                ExportCalendarSettings = false,
                ExportCustomizationSettings = false,
                ExportEmailTrackingSettings = false,
                ExportGeneralSettings = false,
                ExportIsvConfig = false,
                ExportMarketingSettings = false,
                ExportOutlookSynchronizationSettings = false,
                ExportRelationshipRoles = false
            };
            var response = (ExportSolutionResponse)service.Execute(request);
            File.WriteAllBytes(args[0] + "_1_0_0_0.zip", response.ExportSolutionFile);
        }
    }

This program leaves plenty of room for improvements, but it shows the basic idea. You probably want to modify it to fit your needs.

Round up

Automating the export of solutions and checking them in to TFS is a key feature of ALM in any CRM project. It ensures that you have version history of your CRM “source” and it lets you sleep at night knowing that if your CRM dev environments breaks down, it’s just a minor setback – not a disaster.

Display record id

In rare cases, you need to display the ID of a record to the user in CRM, or you just want to be able to debug something and need the GUID at hand. The SDK has a method that will do that for you: Xrm.Page.data.entity.getId();

If you want to wrap it up nicely and display it “CRM style” you can create a web resource and place it on the entity form. Style the web resource to look like CRM and you are set to go. Below is a web resource that almost does the job for CRM 2011. Someone who is better at CSS could probably perfect it.

<!DOCTYPE html PUBLIC "-//W3C//DTD XHTML 1.0 Transitional//EN" "http://www.w3.org/TR/xhtml1/DTD/xhtml1-transitional.dtd">
<html xmlns="http://www.w3.org/1999/xhtml">
<head>
    <script type="text/javascript" src="ClientGlobalContext.js.aspx"></script>
    <script type="text/javascript">

        function ContextInformation() {
            var objectId = window.parent.Xrm.Page.data.entity.getId();
            if (objectId != null)
                document.getElementById('input').value = objectId;
        }

    </script>
    <title>My HTML Web Resource</title>
    <style type="text/css">
        .tableStyle {
            width: 100%;
            border-collapse: collapse;
            border-spacing: 0;
        }

        .labelStyle {
            width: 115px;
        }

        .valueStyle {
            width: fill-available;
        }

        .inputStyle {
            height: 19px;
            color: #000000;
            width: 100%;
            font-family: Segoe UI, Tahoma, Arial;
            font-size: 11px;
            padding: 0;
            margin: 0;
            border: 1px solid black;
            font-size: 100%;
            font: inherit;
            vertical-align: baseline;
            
        }

        body {
            font-family: Segoe UI, Tahoma, Arial;
            color: #3b3b3b;
            font-size: 11px;
            margin: 0;
            padding: 0;
            border: 0;
            background-color: #F6F8FA;
            vertical-align: baseline;
        }
    </style>
</head>
<body onload="ContextInformation();">
    <table class="tableStyle">
        <tr>
            <td class="labelStyle">Record ID</td>
            <td class="valueStyle">
                <input id="input" class="inputStyle" readonly="readonly" /></td>
        </tr>
    </table>
</body>
</html>


Insert it on a form in a web resource that is set up to fill 1 column, is one row high and has no border.